
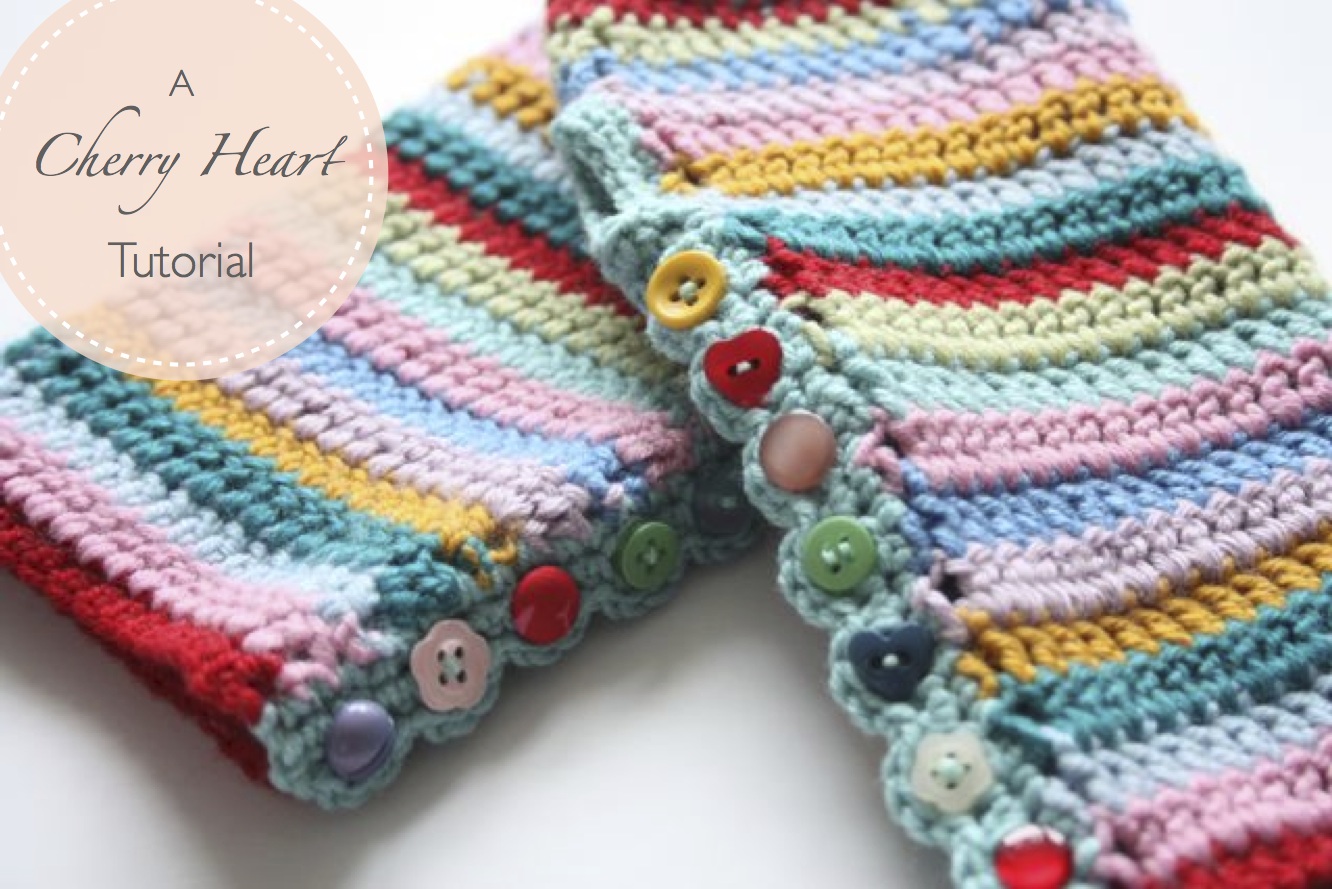
Stripy Mitts Tutorial
★★★ - Tricky
Downloadable PDF Pattern
What you'll need:
Crochet Terms:
This pattern is written in UK terms.
American terms are given below in green.
British (American)
ss - Slip Stitch (Slip Stitch)
ch - Chain (Chain)
dc - Double (Single)
htr - Half Treble (Half Double)
tr - Treble (Double)
dtr - Double Treble (Treble)

Start with a chain of 38 (That's 36 for the stitches and 2 for the turning chain)
Then in the 3rd chain from the hook, make a half-treble.

Carry on along the row, making a half-treble stitch in each chain until you get to the end. You should have 36 stitches.
A word on getting the fit right:
You may need to experiment a little bit with the number of stitches to get the fit just right for you. This worked out just fine for me, and I'd say my hands are about medium. However, we're all different so if you want to vary the size, you need to change the starting chain by 3 each time. So, if you want a tighter fit, start with 3 less chains, 35, or 32 even. If you want to make a larger mitt, start with 41, or 44 chains, etc. The pattern will still work out perfectly as written if you stick to this 'rule of 3'.
Once you've completed your first row, attach a new colour and chain 3 then turn your work.

This time we're going to do a row of trebles. So, go along the row, making one treble stitch in each stitch.
Once you get the the end, attach a new colour, chain 3, turn the work and work another row of trebles.

Carry on like this, attaching a new colour at the end of each row and making rows of trebles.
Checking the fit:
Once you've done about 4 or 5 rows, try wrapping your crochet around your arm and see what sort of fit you're getting. You want it to wrap around but leave a bit of a gap because we've got to add the button band yet and it'll probably stretch a little with wear too. If you're not happy with the size, better to change it now before you get even more done. But if you're happy with the fit then carry on.
Once you've got 15 stripes all done (like the picture on the left) we're ready to join the mitt into the round.
Start a new colour and chain 3, but this time, don't turn the work.

Instead you need to bring the other end of your crochet round as shown in the picture, and our first treble will be made into the other end of the row below. (Where my crochet hook is.)
This is how it looks once the treble has been made.

Carry on making trebles all the way along the row as you normally would.
This picture (above right) shows what it'll lok like when you get back around to the start again. To finish the round, you just need to make a slip stitch into the top of the chain of 3 that we made at the beginning of the round. (Where my crochet hook is.)

That's what it should look like when you're done.
Now just attach a new colour yarn, chain 3 and make trebles right along the row until you get back to the beginning again.

Like this, then make a slip stitch into the top of the chain of 3 again to finish the round.
Make one more round in the same way. Then make another round, this time, chaining 2 to start and going round in the half-treble stitch.

Now to begin the edging at the top. Attach a new yarn colour and chain 1, make a double crochet into the same stitch and then work 1 dc into each stitch along the row until you are back at the beginning again. Slip stitch into the first dc to finish. (But don't break the yarn yet.)
For this next round we're going to work into the back loops of the crochet stitch only. (See the pink arrow on the right hand photo above.)

Chain 3, and then make a slip stitch into the same stitch, using the back loop only (this makes a little picot). See how I only have one loop instead of the normal two.
Then make a ss into each of the next three stitches. Then make another picot by chaining 3 and making a ss into the same stitch.

Carry on right around in the same way, ss into 3 stitches, then chain 3 and ss into the same stitch. It should look like this when you're all done.
Button bands
IMPORTANT: From now on the instructions will change depending on which handed glove you're making. So, I'm going to include the instructions for the second glove in pink. Just ignore those for now though, and carry on following the instructions in black. We'll come back to the pink bits in a while.
So, now we're ready to add button bands, so lay the glove down as show in the picture. We're going to start work on the bottom right corner, on the corner nearest to us. (Shown by my hook in the picture)
Second Glove Part 1 - Here's where things need to be done a little different. So far, everything should look as they do in the picture above, on the right hand side. We're going to start work in the same place too, where the hook is in that picture. But, instead of making a row of trebles, like we did last time, we need to make the button hole band. (Scroll down for 'Second Glove Part 2')
Second Glove Part 1 - Here's where things need to be done a little different. So far, everything should look as they do in the picture above, on the right hand side. We're going to start work in the same place too, where the hook is in that picture. But, instead of making a row of trebles, like we did last time, we need to make the button hole band. (Scroll down for 'Second Glove Part 2')

Start by making a chain of 3, into the end of the htr stripe. Then you'll need to make 2 treble stitches into the end of each tr stripe. Use the picture as a guide. It can be little tricky to wiggle your hook into those side stitches, but do your best.
Carry on making 2 tr's into each end strip until you have worked you way up to stripe 12. That should be 23 stitches (including the starting chain as 1 stitch) Then fasten off the yarn.
Second Glove Part 2 - So, instead of working a row of trebles into the bands as shown above, you need to work a row of dc's. You should still have 23 stitches when you are all done. Then you need to go down and follow steps one to six (as marked below in pink) to complete the button hole band. Then come back to this point.
Are you back and all done? Okay, let's move on to 'Second Glove Part 3'.

Next, turn the glove over and we want to join the yarn at the top of stripe 12 (as shown by my hook in the picture)
Chain 1 and make a dc into the same stitch, then work you way back down the stripes, making 2 dc's into the end of each tr stripe and just 1 dc into the last htr stripe. (Again, you should have 23 stitches in total.)
Second Glove Part 3 - This time, instead of working the button holes as described above, you'll need to work your row of trebles to make the button band. So start with your hook in the same place as shown in the picture above on the left and chain 3, then make a row of trebles, 2 in the end of each row, until you get to the last row, which will only have 1 treble. Again, you should have 23 stitches. Once this is done, you can scroll down until you get to Second Glove Part 4.

Chain 1 and turn the work over. Now we're going to make the button holes.
(Step One)
Make 1 dc into the same stitch, then another dc into the next stitch, then chain 2.
(Step Two)

Skipping one stitch from the row below, make a dc into the next stitch. Then make another dc into the next stitch. This gives us a little hole for the button to go through.
(Step Three)
Carry on up the row, chaining 2, skipping a stitch on the row below and then making 2 dc's. You should end with 2 dc's and have made 7 little holes.
(Step Four)

Turn the work again and make a slip stitch into the 2nd dc, then make 3 dcs into the little hole (chain space), then a slip stitch into each of the two dc's after the space.
(Step Five)
Repeat this along the row, making 3dc's into each chain space and a slip stitch into the dc stitches. When you get to the end, make one last slip stitch into the last dc and fasten off.
(Step Six) - Now go back up to Second Glove Part 2

Now it's time to work the thumbhole. Join the yarn just above the top of the first button band, chain 1 and then make a dc into the same space.
Work your way up the rest of the opening, make 2 dc's into each strip end.
Second Glove Part 4 - Now we need to work the thumbhole in almost the same way as we did before. So start in the same place and follow the instructions as above.

When you get to the top of one side, simply keep going and work down the other side of the opening (like in the picture above).
Keep going until you reach the button band on the other side. We're going to ignore this part of the button band (the part with holes for the buttons to go through), and not crochet into this part at all.
Second Glove Part 5 - Keep following the instructions until you reach the button band on the other side of the glove, as shown in the picture above on the right. This time though, we have the band of trebles facing us, and not the band with holes as you see in the picture. So, we are going to crochet into the end of the button band of trebles. So make 2 dc's into the end of the band. Now move onto to Part 6.

Instead, we're going to jump over to the other button band (made up of treble stitches) and make a dc into that band (see where the hook is in the picture above?). Pull this one nice and tight, then make another dc into the end of this band and then a slip stitch into your first dc at the beginning of the round. I got a total of 18 double crochet stitches.
To complete the thumbhole, we just need to make another round of dc's. So, chain 1 and make a dc into the same stitch. Then carry on around, making 1 dc into each stitch, then make a slip stitch into the beginning of the round to finish.
Second Glove Part 6 - Now that you've made 2 stitches into the end of the button band, you need to ignore the band with the button holes, so leaving this out, you now need to go right back to the beginning of the round and make a slip stitch into the first dc. Pull this up nice and tight.
You then need to make the second row of dc's and you can do that by following the instructions as above (in black) 'To complete the thumb hole...', then you're all done.

Okay, so one glove is complete. I think you deserve a pat on the back for that but your work isn't over yet I'm afraid, because you need one for the other hand too.
This is where the pink instructions come in. Scroll back up to the top and follow the same instructions from the beginning for your second glove, right up to the where I start talking about 'Button bands'. This is the point at which you need to do things slightly different to make a mirror image of the first glove, so you need to follow the pink instructions this time. Hopefully now you've made one, it'll all make sense to you!
Meet me back here with glove number two...
Did you make it? Have you got two gloves now? I hope so!
If you have, let's add some finishing touches...

First of all, if you didn't do it as you went along, you've need to weave those pesky ends in. Once that's all done, you can have some fun picking out buttons. You can use your favourite ones or mix and match like I did, whatever takes your fancy.
I lined mine up first until I was happy with the arrangement and then just sewed them into place on the button band.
Now you are ready to brave the cold or parade around the house as you choose, looking fabulous and colourful while you do it!

I really hope you enjoyed this little tutorial of mine and that you could follow all the steps ok. It was a pretty tricky one this time, so I hope I got it clear enough. Any problems, do let me know.
Why not come and share your creations with us in Cherry Heart's Cozy Corner, my Ravelry group. It's a great place to go if you've got any questions too!
S x
This is where the pink instructions come in. Scroll back up to the top and follow the same instructions from the beginning for your second glove, right up to the where I start talking about 'Button bands'. This is the point at which you need to do things slightly different to make a mirror image of the first glove, so you need to follow the pink instructions this time. Hopefully now you've made one, it'll all make sense to you!
Meet me back here with glove number two...
Did you make it? Have you got two gloves now? I hope so!
If you have, let's add some finishing touches...

First of all, if you didn't do it as you went along, you've need to weave those pesky ends in. Once that's all done, you can have some fun picking out buttons. You can use your favourite ones or mix and match like I did, whatever takes your fancy.
I lined mine up first until I was happy with the arrangement and then just sewed them into place on the button band.
Now you are ready to brave the cold or parade around the house as you choose, looking fabulous and colourful while you do it!

Why not come and share your creations with us in Cherry Heart's Cozy Corner, my Ravelry group. It's a great place to go if you've got any questions too!
S x
♥
Have popped this in to my library in Ravelry - thank you x Jane
ReplyDeleteWoah Sandra, you are very very generous to put together such a thorough tutorial. Great photos to follow too! Thank you
ReplyDeleteLove this tutorial!! Thanx
ReplyDeleteOMG! This is an awesome tutorial, really! Thank you very much!
ReplyDeleteOh I can't wait to give these a go! Thank you so much for the tutorial Sandra!
ReplyDeleteThese are utterly beautiful! THANK YOU for the pattern and tutorial! Can't wait to get started!
ReplyDeletethank you so much.!! Love this pattern, hoping they will be on my hook sometime today.
ReplyDeleteThank you for the great tutorial, these mittens are beautiful
ReplyDeleteNice tutorial. I will make several.
ReplyDeleteWonderful tutorial, this is going on my "to make" list!
ReplyDeleteI'm not a crocheter - but I know a lot of folks who are - wonderful tutorial - adorable mittens. Hope you don't mind me 'sharing'.
ReplyDeletesweet............................
ReplyDeletehermoso
ReplyDeleteAbsolutamente hermoso! Thanks a lot for sharing this wonderful tutorial!
ReplyDeleteThank you so much for creating and sharing this gorgeous tutorial! I immidiatly fell in love with them and made a pair on my blog if you'd like to see them:
ReplyDeletehttp://millieonherworld.wordpress.com/2013/03/18/crazy-colored-cozies-diy-mittens-wpattern/
I've popped and left you a comment. They're lovely, well done you! :)
ReplyDeleteSandra x
Love love your tutorial!!!! And the mittens are soooo lovely...will be perfect once the snowy winds stops blowing here..lol...
ReplyDeleteI'm going to make them! They are lovely!
ReplyDeleteSo beautiful !!
ReplyDeleteThank you for this amazing tutorial!
ReplyDelete